
Realistic reflections in architectural photomontage mean rendering glass, water and other reflective surfaces so they behave the way light actually behaves, not the way a stylised render suggests. Planning-grade work demands reflections that are physically plausible and verifiable against real optical data, not merely convincing at a glance. If you’re briefing a visualiser, ask for HDR capture logs and separate render passes before you approve a single frame.
TL;DR:
- Verifiable photomontage reflections require matching HDR environment logs, camera parameters, and scene orientation to ensure accuracy in sensitive planning scenarios.
- Key material parameters such as IOR and roughness must be set correctly, with variation maps and proper transmission values to achieve realistic glass and water effects.
- Using full ray tracing and balanced transmission and reflection passes is essential for physically plausible results, especially when images will face public scrutiny or official review.
- Common errors include mismatched environmental maps, black window holes from missing data, and overly manipulated sky HDRs, which can be detected through careful pre-submission checks.
- Producing planning-grade reflections involves disciplined workflow, detailed documentation, and full rendering passes, which most in-house teams avoid but are standard in comprehensive visual services.
Table of Contents
- What realistic reflections in photomontage actually depend on
- When do reflections need planning-grade fidelity?
- How to build convincing reflections: a step-by-step workflow
- Material settings that make glass and water behave like glass and water
- Common mistakes and how to catch them before submission
- What clients get wrong most often
- Getting planning-grade reflections without the rework
- Sources
What realistic reflections in photomontage actually depend on
A reflection is not a single visual effect. It is the sum of several things happening at once, and getting one wrong while nailing the others still produces a render that feels off, even to someone who can’t say why.
Every reflective surface mixes two behaviours: how much of its environment it throws back at the viewer, and how sharp or blurred that reflection looks. A polished glass curtain wall behaves almost like a mirror. A textured render or rippled water surface scatters the same light across a wider area, producing a softer, more diffuse reflection. Glass complicates matters further because it doesn’t just reflect. It also transmits light through to whatever sits behind it, and the two effects have to be balanced correctly or the glazing reads as either a mirror or a hole.
That balance only works if the scene context is right in the first place:
- The environment map used to generate reflections has to match the actual sky, ground and surrounding buildings at the site, not a generic HDR pulled from a library.
- The camera position and lens data need to match the photograph being composited into, down to focal length and height.
- Surface orientation matters more than most commissioners expect. A wall angled five degrees off will catch a completely different slice of sky.
When do reflections need planning-grade fidelity?
Not every image needs the same level of rigour, and treating a marketing render with the same process as a submission visual wastes budget in one direction or risks rejection in the other.
Verifiable photomontage fidelity becomes necessary once a scheme sits within a sensitive landscape, faces a public inquiry, or shows a designated or protected view where a planning officer, an inspector, or a third party might challenge the accuracy of what’s shown. In these cases, the Landscape Institute’s technical guidance is explicit: the process behind the image must be replicable, transparent and structured well enough that someone else could reproduce the same view. Reflections on glazing or water in these images aren’t decorative. They’re part of the evidence.
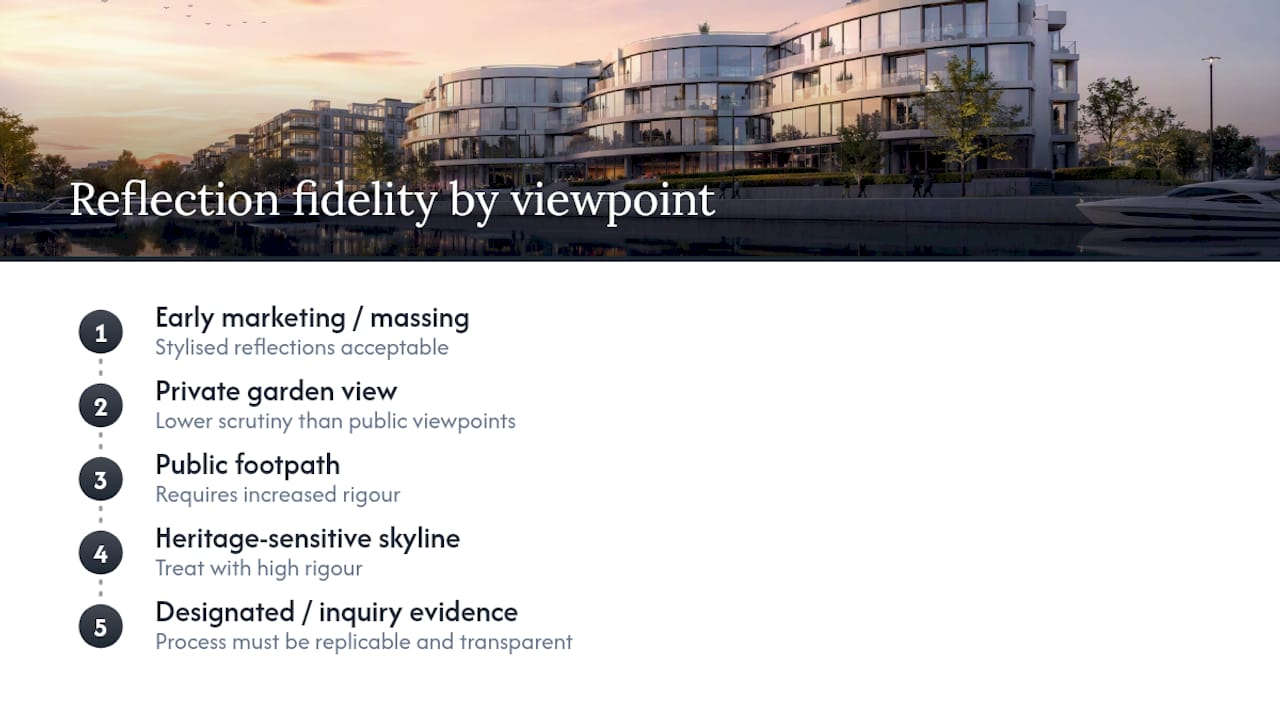
At the other end of the scale, early-concept marketing images, investor mood boards and speculative massing studies rarely need that level of scrutiny. A stylised, slightly idealised reflection is fine when nobody is going to hold the image up against the actual site.
Viewpoint selection sits in between. A private garden view carries less weight than a publicly accessible footpath or a heritage-sensitive skyline view, and LVIA guidance treats proportionality as the operating principle: match the rigour to the sensitivity of the viewpoint, not to the size of the scheme.
How to build convincing reflections: a step-by-step workflow
Getting reflections right is a production discipline, not a single render setting. Here’s the sequence that actually holds up under scrutiny.
- Capture the site correctly. Use a tripod-mounted camera with recorded lens and sensor data, shoot a full HDR panorama from the exact viewpoint, and log survey or wireline notes for anything that will need geo-referencing later. This capture becomes the backbone of every reflection you generate afterwards.
- Match the camera in 3D. Bring the photograph into your 3D package and match focal length, height and orientation precisely. Scale checks against known site dimensions catch errors before they propagate into every reflective surface in the scene.
- Position the HDR environment. Place the captured HDR map so it sits where the real sky and surroundings actually are, not just floating above the model. This single step accounts for more believable reflections than any material tweak that follows.
- Set up physically based materials. Glazing needs correct transmission and IOR values, not a flat “glass” shader preset. Tuning tint, transmission and roughness within PBR controls is what separates a convincing façade from a plastic-looking one.
- Add roughness and imperfection maps. Real glass and water are never perfectly smooth. A subtle roughness map, sometimes with streak or smudge detail, breaks up the mirror-flat look that gives away a CGI render.
- Render the necessary passes. Reflection, transmission, diffuse, alpha and z-depth passes each give a compositor separate control. Full ray tracing produces the most accurate result; screen-space reflection tricks have a place in real-time previews but shouldn’t be the basis of a final planning image.
- Composite with control, not guesswork. Layer the passes back together, use a reflection intensity mask to dial back or strengthen specific areas, and match grain and colour response so the CGI element sits inside the photograph rather than on top of it.
- Document the deliverables. Hand over the parameter sheet, HDR capture log, wireline overlay and each individual render pass alongside the final composite, so the image can be checked and, if challenged, reproduced.
Pro Tip: Ask your visualiser for the reflection intensity mask as a separate file. It lets you request small attenuation changes, dimming a reflection on one panel, brightening another, without triggering a full re-render of the whole scene.
Material settings that make glass and water behave like glass and water
Most unconvincing reflections trace back to two or three parameters set wrong at the material stage, and they’re worth checking before you sign off any render.
Index of refraction (IOR) governs how strongly a surface bends and reflects light. Standard architectural glass sits close to an IOR of 1.45, and water around 1.33. Deviating from these without reason produces reflections that look either too glassy or too flat, even when everything else in the scene is correct.
Roughness is the second lever, and it’s the one commissioners most often overlook:
- A single flat roughness value across an entire glazed elevation is the fastest way to get a fake-looking render, because real glass carries fingerprints, dust, and manufacturing streaks that vary subtly across a panel.
- Roughness maps that introduce that variation, even a very light one, add believability without costing much render time.
- Visible transmittance (VLT) and tint control how much of the reflection competes with what’s showing through the glass. A heavily tinted, low-VLT panel reflects more and transmits less, which changes the whole balance of the shot.
Reference point: treating IOR 1.45 for glass and 1.33 for water as defaults, rather than starting from a generic preset, removes one of the most common sources of rework in reflection-heavy renders.
Real-time engines offer shortcuts here too. Emissive sky planes and planar reflection cards can speed up preview work and client walkthroughs, but they’re approximations, and using them in a final planning-grade image without documenting the substitution risks a mismatch when someone checks the render against the physical scene.
Common mistakes and how to catch them before submission
Most reflection problems in photomontage come down to a handful of repeat offenders, and they’re usually easy to spot once you know where to look.
- Wrong reflection direction or scale. The HDR environment doesn’t match the actual site orientation, so the glazing reflects a sky that doesn’t correspond to where the sun and surroundings really sit.
- Black holes in glazing. Missing environment data or a transmission value set too low turns windows into flat black voids instead of readable, layered surfaces.
- Mismatched grain and tone. CGI elements rendered too clean against a grainy or colour-graded background photograph, giving the reflection an obviously synthetic edge.
- Oversaturated sky boards. A sky HDR that’s been boosted for drama rather than accuracy, which then reflects unrealistically into every glazed surface in the scene.
Before submission, check for wireline reproducibility, request the HDR capture logs, and confirm every render pass has been exported and archived alongside a parameter sheet noting camera data and viewpoint metadata. That combination is what commissioners should be requesting whenever a scheme’s sensitivity calls for verifiable photomontage. When briefing a visualiser or writing a planning submission, ask specifically for “a verifiable photomontage process with documented HDR capture and full render pass exports” rather than simply “a photorealistic image.”
What clients get wrong most often
Most clients underestimate how much of a convincing reflection comes from capture discipline, not render settings. A perfectly tuned material on a poorly matched HDR still looks wrong. If you insist on one deliverable from your visualiser, make it the HDR capture log paired with the reflection and transmission passes; that combination lets anyone check the work, not just admire it. Visual Trick’s planning-grade approach is built around exactly that principle.
— Paride
Getting planning-grade reflections without the rework
Getting reflections right the way this guide describes, matched HDR capture, correct IOR and roughness data, full render pass exports, takes real production discipline, and most in-house marketing teams simply don’t have the time to build that pipeline for every submission. Visualtrick runs that entire process as standard on every project, so glazing, water and reflective finishes hold up whether a planning officer is checking them line by line or a buyer is scrolling past them on a listing.

Every commission includes the parameter sheet, HDR logs and render passes needed to satisfy verification requests, alongside the finished CGI photomontage itself. For schemes viewed from height, such as reflective roofscapes or waterside developments, aerial CGI photomontage extends the same material accuracy to elevated viewpoints. Teams building a wider marketing package also benefit from the presentation discipline covered in this landscaping industry SEO guide, which speaks to how structured visual work wins more contracts. If you’re preparing a planning submission or a marketing campaign that needs reflections nobody can pick apart, get in touch through Visualtrick’s 3D rendering services page and request a quote for your next set of visuals.
Sources
- Landscape Institute technical guidance (TGN 06/19) — visual representation of development proposals
- Visual representation of development proposals (LI Advice note excerpt)
