
Planning-grade visuals frequently influence officer and committee decisions when they are accurate, verifiable, and explicitly referenced in the written case. That is not a soft claim. Evidence from urban visualisation practice shows that visual approaches reduce rework by 44% and cut stakeholder alignment iterations by approximately 3.1 rounds compared with manual methods. For a major application where a single round of officer queries can cost weeks, that efficiency gain is worth taking seriously.
The visuals with the strongest effect on decisions fall into three situations:
- Major applications, where many local planning authorities (LPAs) now explicitly require or strongly expect 3D model submissions, vetted against local file and metadata requirements.
- Heritage, conservation, and sensitive infill schemes, where photomontages and verified views are the standard tool for demonstrating that a proposal respects its context.
- Committee presentations and pre-application stages, where a well-prepared verified viewpoint or CGI render can resolve officer concerns before they become formal objections.
The reference framework for assessing visual effects in landscapes and townscapes is GLVIA/GLVIA3, published by the Landscape Institute and the Institute of Environmental Management and Assessment. Any Visual Impact Assessment (VIA) submitted to a UK LPA should follow its methodology and terminology. Ordnance Survey data, specifically OS MasterMap, is the accepted base for georeferencing 3D models and verifying viewpoint coordinates. Visualtrick, which produces planning-grade CGI, verified views, and methodology annexes for UK submissions, is one example of a supplier whose outputs are built to these standards.
Table of Contents
- What types of planning visuals are there, and when should you use them?
- What do local planning authorities actually expect from your visuals?
- What is a Visual Impact Assessment and when do you need one?
- How should you place and reference visuals in a planning submission?
- What do planning visuals typically cost, and how long do they take?
- How do you brief a visualisation supplier to get planning-grade outputs?
- When can visuals harm an application, and how do you avoid the common pitfalls?
- A planning-ready deliverable checklist you can hand to your visualiser
- Key takeaways
- What planning officers actually look for: a studio perspective
- Visualtrick: planning-grade visuals for UK submissions
- Useful sources and further reading
What types of planning visuals are there, and when should you use them?
The visual types used in UK planning applications are not interchangeable. Each serves a specific evidential purpose, and choosing the wrong one for the decision stage is a common source of delay.
- Photomontage: a composite image that overlays a proposed development onto a site photograph. Used for street-scene assessments, conservation area appraisals, and any situation where the relationship between the proposal and its immediate context needs to be shown at eye level.
- Verified view: a photomontage produced to a documented protocol, with confirmed camera position, lens parameters, and plate height. The verification process is what makes it admissible as planning evidence rather than illustrative imagery.
- CGI render: a computer-generated image of the finished building, produced from a 3D model. Used for design quality assessments, marketing, and committee packs. Photorealism varies; planning-grade renders should reflect actual materials and massing, not idealised lighting.
- Massing model / wireframe: a simplified 3D representation showing bulk, height, and footprint without surface detail. Most useful at pre-application stage and for testing daylight, overshadowing, and bulk against policy thresholds.
- Full 3D model: a georeferenced digital model submitted as a file (typically FBX, OBJ, or IFC format). Major planning applications must be accompanied by specific 3D model submissions; high-quality 3D visuals or photomontages are increasingly recommended for smaller, sensitive, or complex infill projects.
- Virtual reality (VR) and interactive 3D: used for stakeholder engagement, public consultation, and officer briefings. Digital twins and interactive 3D workflows materially reduce miscommunication and speed approvals compared with static outputs; teams report fewer late-stage changes when adopting interactive visual practice.
- Annotated diagrams and cross-sections: scaled drawings that demonstrate policy compliance, separation distances, ridge heights, and site relationships. These are the workhorses of the Design & Access Statement and are often more persuasive to officers than photorealistic imagery because they are unambiguous.
- Story poles: physical or digitally simulated markers that show the height and bulk of a proposed structure on site. Procedural requirements typically include a photographic record from specified viewpoints with clear labelling of camera positions.
By project type, the practical guidance is straightforward. Major developments need digital 3D models, verified viewpoints, and a VIA. Sensitive infill and conservation schemes need photomontages, line drawings, and style-appropriate illustrations that show the proposal in its historic setting. Small domestic extensions can usually be supported by photo-based simulations, with story poles reserved for situations where bulk or height is the central planning issue.
The strongest submissions use prediction tools to test policy compliance and separate illustration tools to create persuasive visual evidence. They are complementary, not alternatives.
What do local planning authorities actually expect from your visuals?
LPAs are not looking for impressive imagery. They are looking for verifiable evidence. The distinction matters because a visually striking render that cannot be checked against real-world data will be treated with scepticism, or dismissed entirely.
Pro Tip: Include a short methodology annex with every visual set, listing data sources, author, date, camera parameters, and how the model was georeferenced. Officers who cannot verify your inputs will ask for more information; officers who can verify them move on.
The standard LPA checklist for visual submissions typically covers:
- Photograph locations and directions, with Ordnance Survey grid references.
- Camera plate heights (the height above ground at which each photograph was taken).
- Property boundaries, trees, and outbuildings photographed and annotated on a site plan.
- File formats and resolution specifications for portal upload.
- A methodology statement showing inputs and workflow.
The data sources that lend credibility are well established. Planning officers expect evidence of inputs such as OS MasterMap, LiDAR, and measured building surveys, along with a methodology note. Submitting a 3D file without explaining data sources risks the model being dismissed as unreliable. OS MasterMap provides the authoritative base for site boundaries and topography; LiDAR adds accurate ground and building height data; measured building surveys are needed where existing structures must be modelled precisely.
Metadata is not a bureaucratic formality. It is what allows an officer, or an inspector at appeal, to reproduce your viewpoint independently and confirm that the image is an accurate representation. When verified viewpoints are required, the accepted practice is to supply the original site photograph annotated with the precise camera position and direction, the image scale, and any assumptions about future tree growth or screening. This allows reproducibility and officer verification.
For planning authorities needing accurate visuals, the underlying principle is simple: visuals anchored to accurate data sources and supplied with metadata are more likely to be treated as admissible and persuasive evidence.
What is a Visual Impact Assessment and when do you need one?
A Visual Impact Assessment is a structured, written assessment of the visual effects of a proposed development across a set of identified viewpoints. It is not the same as a set of photomontages, though photomontages are usually its primary deliverable. The VIA evaluates who sees the development, from where, how significant the change is, and whether that change is acceptable against policy.
When to commission a VIA
Commission a VIA when the application involves any of the following:
- A major development (10 or more dwellings, or a commercial development above the relevant floor-area threshold).
- A proposal affecting key public views identified in a local plan, townscape character appraisal, or conservation area appraisal.
- A site within or adjacent to a conservation area, listed building setting, or designated landscape.
- A situation where the LPA’s pre-application advice has flagged visual amenity or townscape character as a concern.
- An application that is likely to go to committee, where members will need clear visual evidence to reach a decision.
Standard VIA methodology
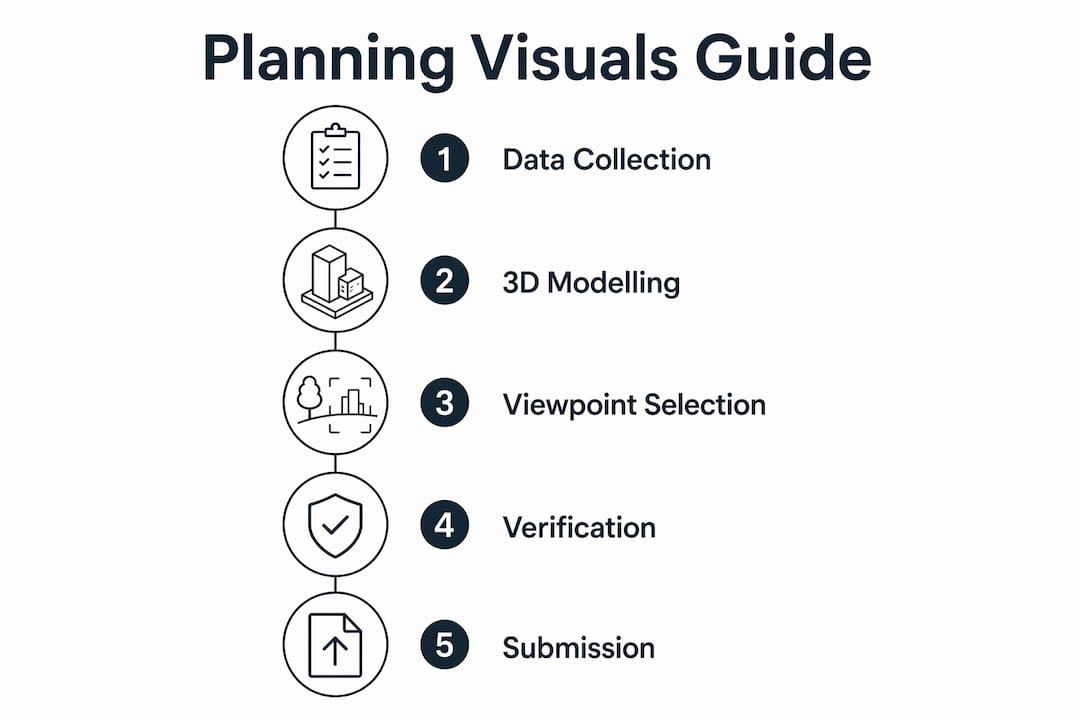
The accepted methodology follows GLVIA/GLVIA3. The key steps are: selection of representative viewpoints (agreed with the LPA where possible), photographic survey from each viewpoint, production of verified photomontages, assessment of cumulative effects where other consented developments exist, and evaluation of receptor sensitivity and significance of effect using the criteria GLVIA/GLVIA3 sets out.
Standard VIA deliverables
| Deliverable | Purpose |
|---|---|
| Viewpoint schedule | Lists each viewpoint with grid reference, camera height, and receptor type |
| Photographic record | Original site photographs with annotated camera data |
| Verified photomontages | Composite images produced to documented verification protocol |
| Cross-sections and wireframes | Show massing and height relationships at key viewpoints |
| Written assessment | Evaluates significance of visual effect at each viewpoint against GLVIA/GLVIA3 criteria |
| Cumulative effects assessment | Addresses combined visual impact with other consented schemes |
How should you place and reference visuals in a planning submission?
Visuals that are not explicitly referenced in the written case are routinely ignored. An officer reading a Design & Access Statement who encounters a figure number in the text will look it up; an officer who finds a folder of images with no cross-references may not. The integration of visuals into the written submission is as important as their technical quality.
High-quality visuals speed officer and committee comprehension, but they do not replace the Design & Access Statement. Visual dashboards and approaches have been shown to reduce project rework by 44% and decrease stakeholder alignment iterations by about 3.1 compared to manual methods. Visuals should always be explicitly referenced in the written case.
Practical guidance for placement:
- Design & Access Statement: reference each figure by number at the point in the text where the visual evidence is relevant. Captions should include viewpoint name, grid reference, camera height, date, author, and data sources.
- Planning statement: cross-reference photomontages and verified views when addressing visual amenity, townscape character, or heritage impact policies.
- Site context appendices: include annotated site plans showing viewpoint locations, photograph directions, and the extent of the visibility study area.
- Pre-application material: a single verified viewpoint submitted at pre-app stage can resolve officer concerns about scale or massing before they become formal objections. This is one of the highest-value uses of planning visuals.
- Committee packs: scaled boards and printed photomontages for members who will view them in a council chamber. For significant schemes, an interactive 3D model or flythrough shown at the officer briefing can be more persuasive than any static image.
- Public consultation: printed photomontages at A1 or A0 scale for community events; interactive 3D or VR for online consultations where participants can explore the scheme themselves.
A caption template worth copying: “Figure [X]: [Viewpoint name]. Camera position: [OS grid reference]. Camera height: [X.Xm above ground level]. Date: [DD Month YYYY]. Author: [Name/Studio]. Data sources: OS MasterMap [date], LiDAR [date], measured survey [date].”
For a practical guide to integrating visuals into a submission pack, Visualtrick’s architectural CGI planning submission guide covers the workflow from model to final deliverable.
What do planning visuals typically cost, and how long do they take?
Cost and lead time vary considerably depending on scope, but the main drivers are predictable. Understanding them lets you build a realistic programme and avoid the most common procurement mistake: commissioning visuals too late to allow for iteration.
| Visual type | Indicative cost range | Typical lead time |
|---|---|---|
| Simple photomontage (1–2 views, no survey) | — | 3 days |
| Verified photomontage (with camera calibration and methodology note) | — | 1–3 weeks |
| Full VIA (multiple verified views, written assessment, GLVIA/GLVIA3 methodology) | — | 4–10 weeks |
| 3D massing model (georeferenced, with methodology note) | — | 2–4 weeks |
| Photorealistic CGI render (planning-grade, with metadata) | — | 1–2 weeks |
These ranges are indicative. Actual costs depend on site complexity, number of viewpoints, survey requirements, and iteration rounds.
The main cost drivers are:
- Number of verified viewpoints: each requires a site visit, camera calibration, and a documented verification protocol.
- Survey requirements: if OS MasterMap and LiDAR do not provide sufficient accuracy for the site, a measured building survey adds cost and time.
- Level of photorealism: planning-grade renders require accurate materials, realistic lighting, and contextual accuracy. Faster, cheaper renders produced with AI tools can shorten lead times, but AI tools can produce submission-ready imagery quickly; however, the written Design & Access Statement remains the primary instrument for articulating policy compliance, and AI-generated imagery must still meet the same metadata and verification standards as manually produced work.
- Iteration cycles: every round of design changes that requires updated visuals adds cost. Commissioning visuals early, at massing model stage, reduces the number of late iterations.
Pro Tip: Build visual production into your programme at pre-application stage, not after submission. A verified view produced at pre-app costs the same as one produced at submission, but it gives you the chance to resolve officer concerns before they become conditions or refusals.
How do you brief a visualisation supplier to get planning-grade outputs?
The gap between a supplier who produces planning-grade deliverables and one who produces attractive imagery is usually visible in the brief they ask for. A supplier with genuine planning experience will ask about viewpoint selection, LPA requirements, and the methodology note before they ask about materials or lighting.
Minimum deliverables to request in any brief:
- Verified photomontages with source photographs, annotated camera data, and a signed methodology note.
- Original site photographs with OS grid references and camera parameters.
- 3D model exports in FBX, OBJ, or IFC format as required by the LPA.
- Annotated viewpoint location plan showing camera positions and directions.
- Metadata files for each image (date, author, data sources, software used).
- Ownership and licence statement confirming the commissioning party holds rights to all outputs.
Questions that reveal planning experience:
- Do you use OS MasterMap, LiDAR, or measured surveys as your base data?
- How do you verify viewpoints and camera calibration?
- Who signs the methodology note, and what does it cover?
- Can you supply source files for officer or inspector review?
- What is your position on AI-generated elements, and how do you confirm copyright ownership?
On the last point: copyright of AI-generated and computer-generated works must be confirmed before submission. Check tool terms to confirm that the commissioning party owns the output; national guidance treats computer-generated works under specific copyright frameworks that differ from human-authored works.
When evaluating bids, look for: evidence of previous planning approvals (not just marketing images), a sample methodology note, a clear statement on turnaround and iteration policy, and confirmation of image ownership. The workflow from 3D model to planning image is a useful reference for understanding what a credible supplier’s process should look like.
When can visuals harm an application, and how do you avoid the common pitfalls?
Visuals can work against an application as readily as they support one. The most common failure mode is not technical incompetence; it is a mismatch between what the visual shows and what the written case argues.
Common pitfalls:
- Inaccurate scale or plate heights: a photomontage where the proposed building appears smaller than it would in reality will be identified by an experienced officer. The consequence is not just scepticism about that image; it is scepticism about the entire submission.
- Idealised materials and lighting: renders that show a building in perfect summer light with pristine materials and no surrounding context can make a policy breach obvious to anyone who compares the image with the site. Officers and objectors both notice.
- Missing viewpoint metadata: a photomontage without a documented camera position and calibration cannot be verified. Officers will either request further information or discount the image entirely.
- Low resolution or poor print quality: images that pixelate when printed at A1 scale, or that are submitted as compressed JPEGs, undermine the credibility of the submission.
- Unsupported AI imagery: AI tools can generate plausible-looking visuals quickly, but an image that cannot be traced back to a verified 3D model and documented camera position is not planning evidence. It is illustration.
Pro Tip: Before finalising any visual, run a quick policy check. If the image makes a policy breach obvious, either adjust the design or hold the image back until the written case addresses the issue directly. Publishing a visual that contradicts your planning statement is one of the fastest ways to generate a refusal.
Research into the use of visualisations in planning processes confirms that planners maintain healthy scepticism about images they cannot verify, and that architects often overestimate planners’ ability to see through misleading or incomplete visuals. Transparency about assumptions and methodology is what builds credibility, not photorealism.
For appeals and public inquiries, the standards are higher still. Visuals submitted as expert evidence must be capable of withstanding cross-examination, which means every parameter must be documented and reproducible. The role of 3D visuals in planning public inquiries covers the specific requirements for appeal contexts.
A planning-ready deliverable checklist you can hand to your visualiser
Use this checklist as the basis for your brief. It covers the minimum files, metadata, and protocols for a UK planning submission.
Files and deliverables:
- Verified views schedule (viewpoint name, OS grid reference, camera height, receptor type).
- Original site photographs (RAW or high-resolution JPEG, with EXIF data intact).
- Final photomontages: high-resolution TIFF or PDF for print, compressed JPEG or PDF for portal upload.
- 3D model exports: FBX, OBJ, or IFC as specified by the LPA.
- Methodology note: data sources, software, camera calibration method, georeferencing approach, author, and date.
- Ownership and licence statement: confirms the commissioning party holds all rights to outputs, including any AI-generated elements.
- Annotated viewpoint location plan: OS-based, showing camera positions, directions, and viewpoint numbers.
Placement in the submission:
- Reference the methodology note as an appendix to the Design & Access Statement.
- Number all figures sequentially and cross-reference each one in the relevant section of the written case.
- Include the viewpoint location plan as a standalone figure in the site context section.
- For VIA submissions, attach the full photographic record and verified photomontages as a separate technical appendix.
- Label all files with a consistent naming convention:
[ProjectRef]_[ViewpointNo]_[VisualType]_[Version]_[Date].
Version control:
Label each iteration clearly: v1_preapp, v2_submission, v3_committee. Officers and inspectors tracking changes between pre-application, submission, and committee stages need to identify which version they are looking at without opening the file. A simple version log at the front of the methodology note, listing what changed and why, takes ten minutes to produce and prevents significant confusion at committee.
The visualisation brief guide for planning consultancy from Visualtrick provides a downloadable template that covers these items in a format ready to send to a supplier.
Key takeaways
Planning-grade visuals require verified inputs, documented methodology, and explicit integration into the written case to function as credible evidence rather than decoration.
| Point | Details |
|---|---|
| Verify your inputs | Use OS MasterMap, LiDAR, or measured surveys as your base data; undocumented inputs risk officer dismissal. |
| Always include a methodology note | List data sources, camera parameters, author, and date; this is what makes a visual admissible as planning evidence. |
| Match the visual type to the decision | Verified photomontages for officer assessment, massing models for pre-app, CGI renders for committee; the wrong type at the wrong stage delays decisions. |
| Avoid idealised imagery | Renders that mask policy non-compliance or omit context will be identified; transparency builds credibility faster than photorealism. |
| Visualtrick for planning-grade outputs | Visualtrick produces verified views, CGI renders, and methodology annexes built to UK LPA standards, with clear ownership and licence documentation. |
What planning officers actually look for: a studio perspective
There is a tendency in the industry to treat planning visuals as a design communication problem. Get the render beautiful enough, the argument goes, and the committee will be won over. That framing misses what actually happens in a planning officer’s assessment.
Officers are not evaluating aesthetics. They are checking whether the visual evidence supports or contradicts the written case, and whether the methodology is transparent enough to be trusted. A photomontage that shows a building looking smaller than it is does not impress an experienced officer; it puts them on alert for other inconsistencies in the submission. A verified view with a signed methodology note and OS-referenced camera position, even if the building it shows is not particularly attractive, tells an officer that the applicant is being straight with them.
The single most consistent observation from working on planning submissions is that the procedural steps matter more than the visual quality. Adding one verified viewpoint at pre-application stage, with a clear methodology note, reduces the number of officer information requests on the full submission. Not because the image is more beautiful, but because the officer has already confirmed that the applicant’s visual methodology is sound.
The same principle applies at committee. Members who are not planning professionals respond to clarity, not complexity. A single well-captioned photomontage showing the proposal in its street context, printed at a readable scale, is more persuasive than a folder of high-resolution renders that require a laptop to view. The visual that wins a committee vote is usually the simplest one that answers the question the members are actually asking: what will this look like from the street?
Visualtrick: planning-grade visuals for UK submissions
If you are commissioning visuals for a planning application and need outputs that will hold up to officer scrutiny, Visualtrick produces planning-grade CGI and verified views built to UK LPA standards. Every deliverable comes with a methodology note, OS-referenced camera data, and a clear ownership statement confirming the commissioning party holds full rights to all outputs, including any AI-assisted elements.

The studio works across major residential, commercial, healthcare, and care sector applications, producing verified photomontages, massing models, full VIA visual packages, and the methodology annexes that make them admissible as planning evidence. For architects and developers who need architectural visualisation services that go beyond attractive imagery and meet the evidential standards LPAs actually apply, Visualtrick is a direct route to planning-ready deliverables. Get in touch for a bespoke quote, or download the briefing template to start your next commission with the right specification from day one.
Useful sources and further reading
-
Southwark Council: planning checklists for full planning applications — one of the most detailed publicly available LPA checklists covering 3D model submission requirements, metadata expectations, and file format specifications. A useful benchmark for what other LPAs are moving towards.
-
GLVIA/GLVIA3 (Landscape Institute and IEMA) — the accepted reference framework for Visual Impact Assessments in the UK. Any VIA submitted to a UK LPA should follow its methodology for viewpoint selection, receptor sensitivity, and significance of effect.
-
Ordnance Survey MasterMap — the authoritative base data for georeferencing 3D models and verifying viewpoint coordinates in UK planning submissions.
-
Why visualise urban data: a guide for planners — practical evidence on the efficiency benefits of visual approaches in planning, including the 44% rework reduction and stakeholder iteration data cited in this article.
-
Visual Aids and Story Poles (Santa Barbara planning handout) — an illustrative example of procedural requirements for visual aids, covering photographic records, camera position labelling, and story pole installation rules. Useful as a comparator for UK practice.
-
An investigation into the use of visualisations in the resource consent process — peer-reviewed research on how planners actually use and evaluate visualisations in consent processes, including the transparency and methodology issues that affect credibility.
-
MHCLG digital team blog — government digital team commentary on the shift towards richer digital submissions and the use of AI in converting planning records to geospatial formats.
