
A planning uplift render is a photorealistic CGI or verified photomontage produced specifically to support a UK planning application, illustrate a proposed development for committees and consultees, or strengthen marketing and investor materials. Producers like Visualtrick build these visuals from survey data, architectural drawings and site photography, following recognised UK standards including the Landscape Institute Advice Note 01/11 and the Highland Council visualisation standards (2010), so that every image is replicable, transparent and capable of withstanding scrutiny at public inquiry.
The term “planning uplift render” is not formal industry vocabulary. The recognised technical terms are verified photomontage and Accurate Visual Representation (AVR) or Verified Visual Montage (VVM). Both phrases appear throughout this guide because you will encounter them interchangeably in briefs, LVIA appendices and local authority correspondence.
Primary uses include:
- Supporting Landscape and Visual Impact Assessments (LVIA) from defined viewpoints
- Planning committee packs and officer reports
- Public consultation boards
- Investor pitch decks and sales brochures
Pro Tip: Choose a verified photomontage over a generic CGI whenever the application will face scrutiny at committee or public inquiry, or when the LVIA requires viewpoint-specific visual effects to be demonstrated. A generic render cannot be independently replicated; a verified photomontage can.
Key takeaways
A planning uplift render is a verified photomontage or AVR produced to a replicable, documented methodology, and its credibility depends entirely on the quality of the survey, camera data and source files behind it.
| Point | Details |
|---|---|
| Core definition | A planning uplift render is a verified photomontage or AVR built from survey data, photography and a 3D model. |
| Metadata is mandatory | Every submission needs viewpoint coordinates, camera EXIF, model version and a tolerance statement. |
| Match AVR level to scrutiny | Use Level 0–1 for early design; Level 3 for EIA applications and public inquiries. |
| Key commissioning question | Ask suppliers for the surveyor’s coordinate CSV and unflattened model files before agreeing terms. |
| Visualtrick | Produces planning-ready verified photomontages with full verification documentation for UK planning submissions. |
Table of Contents
- Why planning uplift renders are commissioned
- How a verified photomontage is produced
- What makes a render planning-ready: the submission checklist
- UK guidance and what planning officers commonly expect
- What renders cannot do and common mistakes that undermine credibility
- How to commission a planning render: brief, timeline and costs
- What consistently improves planning visual outcomes
- Visualtrick’s planning render services
- Sources
Why planning uplift renders are commissioned
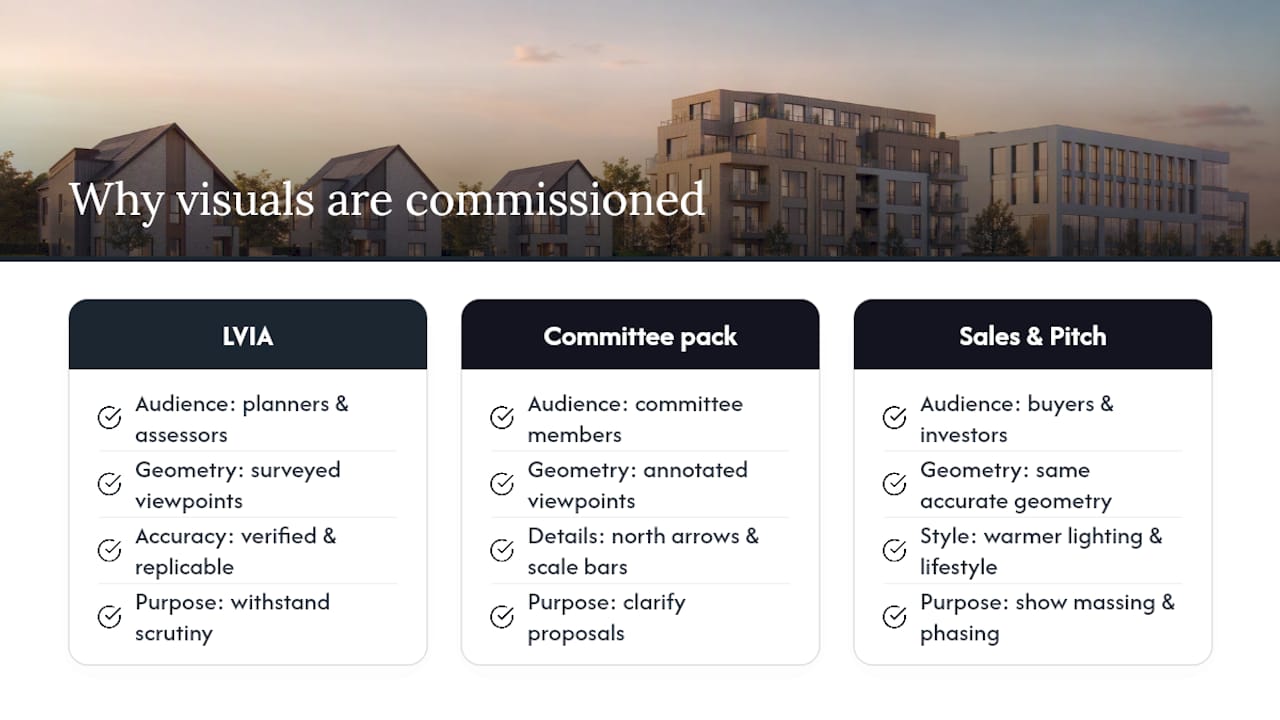
CGI visualisations translate architectural drawings into realistic, project-specific images that clarify scale, massing, materials and relationships to neighbouring properties for planners and lay audiences. That translation matters because planning officers and committee members are rarely trained to read technical drawings, and a misread section can kill an otherwise sound application.
Within an LVIA, verified photomontages are intended to be as accurate as technically possible, replicable and able to withstand scrutiny during planning determinations and public inquiry. They show the visual effect of a proposal from specific, surveyed viewpoints, giving the assessor a defensible basis for their conclusions rather than a subjective impression.
Beyond planning, the same assets serve multiple audiences. A planning committee pack needs annotated viewpoints with north arrows and scale bars. A sales brochure needs the same geometry but with warmer lighting and lifestyle context. An investor pitch needs massing clarity and phasing diagrams. Commissioning a verified photomontage first means every downstream output shares a geometrically accurate foundation.
Visualisation also drives planning uplift directly: well-executed visuals clarify proposals to committees, consultees and investors in ways that written descriptions alone cannot achieve.
How a verified photomontage is produced
Verified views are produced using survey data, photography and 3D modelling, with AVR levels 0–3 indicating increasing detail. Level 3 images incorporate materials, textures and real-world lighting. The production sequence below reflects that workflow.
- Survey and georeferencing. OS mapping, LiDAR data and a measured topographic survey establish the site’s precise coordinates. Accurate georeferencing is the foundation; errors here propagate through every subsequent step.
- Viewpoint selection. Viewpoints are chosen to represent the most visually sensitive receptors: public rights of way, residential windows, heritage settings. Each viewpoint is physically surveyed and its National Grid coordinates recorded.
- Photography. Images are captured at the surveyed viewpoint using a calibrated camera. EXIF metadata (focal length, sensor size, date, time, GPS) is recorded and retained. Lens distortion is corrected before compositing.
- Camera matching. The photographic plate is imported into the 3D software and the virtual camera is matched to the real camera’s position, height, focal length and orientation using the survey data.
- 3D model construction. A geometrically accurate model is built from the architect’s drawings or BIM files. At AVR Level 3, materials, textures and sun/sky lighting are added to match the photograph’s conditions.
- Compositing. The rendered model is composited into the photographic plate. Tonal and colour matching aligns the CGI with the ambient light, sky tone and shadow direction of the original photograph.
- Verification. A verification check confirms that the image can be reproduced independently. Source files, viewpoint coordinates, camera log and model version are documented.
A metadata table should accompany every verified photomontage:
| Parameter | Required content |
|---|---|
| Viewpoint coordinates | Easting, Northing, height (AOD) |
| Camera EXIF | Make, model, focal length, sensor size, date/time |
| Lens correction | Software used, distortion profile applied |
| Model version | File name, revision number, date |
| Tolerance statement | Positional accuracy of survey |
| Author | Studio name, contact, date of issue |
Pro Tip: Ask your supplier to deliver the surveyor’s CSV of viewpoint coordinates and the unflattened, layered model files alongside the final image. If a planning inspector questions the methodology, those files let anyone replicate the view independently.
What makes a render planning-ready: the submission checklist
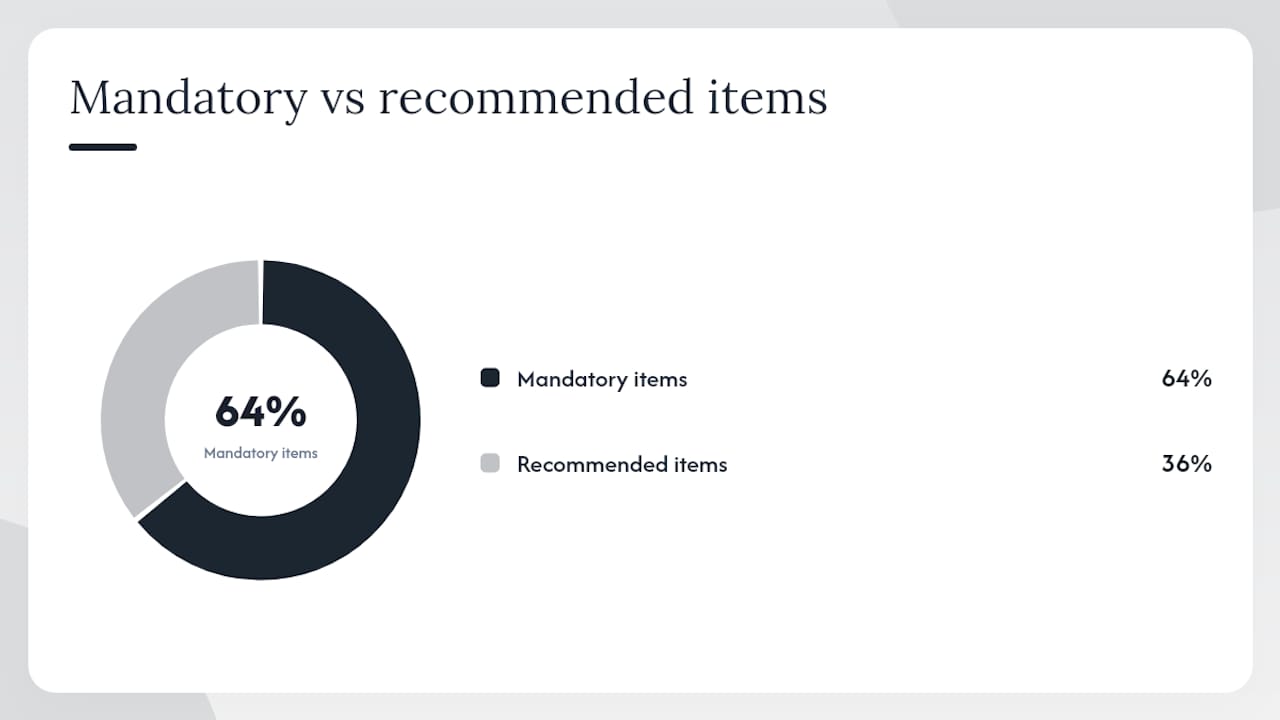
A planning officer or LVIA reviewer expects specific items before accepting a photomontage as evidence. The Visualtrick planning-ready checklist consolidates these for current submissions.
Mandatory items:
- Surveyed viewpoint coordinates (Easting, Northing, AOD height)
- Photographic plate at full resolution (uncompressed TIFF preferred)
- Camera EXIF metadata table
- Scale marker or annotated reference object
- North arrow
- Date and time of photography
- Level datum reference
- Model version number and author credit
- Annotation of key features (site boundary, proposed ridge height, nearest receptor)
Recommended file deliverables:
- High-resolution TIFF or JPEG (minimum 300 dpi at A1 print size)
- Layered PSD or equivalent master compositing file
- Untextured model export (OBJ or DWG)
- Survey CSV with viewpoint coordinates
- Camera log (EXIF export or manual record)
When preparing Design and Access Statement appendices or LVIA visual chapters, present each photomontage on a single page with the metadata table beneath the image. Planning officers read these documents quickly; a clear layout prevents the visual being overlooked or misread.
UK guidance and what planning officers commonly expect
Verified Visual Montages are verifiable images created from defined real locations using quantifiable data and are valuable in EIA, public consultation and planning committees. Two documents set the benchmark most UK authorities reference.
- Landscape Institute Advice Note 01/11 is the primary national reference for photomontage methodology. It requires a replicable, transparent production process: defined viewpoints, documented camera data, and source files that allow independent verification. Any photomontage submitted in support of an LVIA should demonstrably follow this note.
- Highland Council visualisation standards (2010) is a detailed local standard that other authorities have adopted or adapted. It specifies camera height, field of view, print size and annotation requirements. Even where your LPA does not formally require it, aligning to Highland Council’s standard signals rigour.
AVR level selection is a proportional decision tied to the application type and the level of scrutiny anticipated:
- AVR Level 0: block or massing model, no materials. Appropriate for early-stage design development.
- AVR Level 1: basic form with outline materials. Suitable for pre-application discussions.
- AVR Level 2: detailed model with materials and basic lighting. Common for standard planning submissions.
- AVR Level 3: full materials, textures and real-world lighting matched to the photographic plate. Required for EIA applications, public inquiries and any submission where visual impact is a primary contested issue.
What renders cannot do and common mistakes that undermine credibility
A photomontage is a representation, not a substitute for professional judgement. It does not replace the written LVIA text, the site assessment, or the landscape architect’s conclusions. Reviewers who conflate the image with the assessment weaken their own case.
Common red flags that planning officers and inspectors flag:
- Missing camera metadata: if the EXIF data is absent or the viewpoint is undocumented, the image cannot be verified and may be dismissed.
- Mismatched scale: a building that appears smaller than it would in reality, whether through lens choice or incorrect camera height, is a credibility risk that opponents will exploit.
- Inconsistent shadowing or lighting: CGI shadows that contradict the sun angle in the photograph immediately signal poor compositing.
- Unrealistic materials: overly clean or saturated textures that bear no relation to the specified materials undermine trust in the whole submission.
- No source files: refusing to provide layered files or survey data suggests the methodology cannot withstand scrutiny.
Pro Tip: Before submitting, ask a colleague unfamiliar with the project to review the photomontage against the metadata table. If they cannot confirm the viewpoint, scale and shadow direction independently, the image is not yet planning-ready.
How to commission a planning render: brief, timeline and costs
A clear brief prevents the most common delays. Include the following when approaching a supplier:
- Project address and site plan with red-line boundary
- Architectural drawings or BIM/CAD files at the latest revision
- Desired viewpoints (or a request for viewpoint recommendations)
- Intended use: planning submission, LVIA, public consultation, marketing, or a combination
- AVR level required
- Any local authority pre-application guidance or specific visualisation requirements
- Submission deadline
A typical delivery timeline for a single verified photomontage runs from about one to three weeks, depending on project complexity and scheduling.
Typical UK costs for verified photomontages vary widely depending on project complexity and scope, ranging from several hundred to several thousand pounds per image or package, with increases expected for difficult conditions or high-detail requirements.
Questions to ask any supplier before commissioning:
- What survey sources do you use, and can you provide the surveyor’s coordinate CSV?
- Which software do you use for camera matching and 3D modelling?
- Can you share examples of photomontages that have supported approved applications?
- How do you document your verification workflow, and what files will you deliver?
Visualtrick’s CGI for planning applications service uses mapping, survey and model data to position proposals correctly in context, with full verification documentation included in the deliverable pack.
What consistently improves planning visual outcomes
The single most reliable improvement is early integration. When the visualisation team is brought in at RIBA Stage 2 rather than Stage 4, viewpoints can be selected before the design is fixed, and a single difficult view often resolves massing or material decisions that would otherwise require expensive late-stage revisions.
Testing one challenging viewpoint early, before preparing a full pack, is a discipline that consistently saves time. If the massing reads poorly from the most sensitive receptor, better to know at Stage 2 than two weeks before submission.
For committee reports, the combination of a verified photomontage and a clear written narrative outperforms either alone. A planning officer who can point to a replicable image and a well-argued visual impact assessment is better placed to recommend approval than one relying on drawings that committee members cannot interpret.
Visualtrick’s planning render services
Visualtrick produces planning-ready visuals for developers, architects and planning consultants across the UK, from single verified photomontages to full multi-view planning packs. Every deliverable includes the verification metadata, layered source files and survey documentation that planning officers and LVIA authors need.

For architects and planning consultants who need architectural visualisation that holds up at committee and public inquiry, Visualtrick’s planning packs include the complete file set: high-resolution composites, layered PSDs, untextured model exports, survey CSVs and camera logs. Get in touch to discuss your viewpoints, AVR level and submission timeline.
