
The reliable path runs prepare in SketchUp, choose a live-link for iterative jobs or an export/import route for one-off finals, then finish materials, lighting, and camera work inside the renderer before post-production. Live-linking suits projects with frequent design changes; export/import suits a locked design heading to final frame. Most failed handoffs trace back to unscaled geometry, reversed faces, or absolute texture paths, so catch those before anything leaves SketchUp.
TL;DR:
- Using plugin-in-host rendering is ideal for quick internal studies, but it offers less control over light transport and post-processing quality.
- Proper model preparation, including scaling, face correction, and organized tagging, is essential to prevent errors and streamline the export and import process.
- FayFX, FBX, and USD/USDA are the most reliable formats for transferring models, with relative texture paths and consistent naming conventions reducing import issues.
- Manual rebuilding of materials inside the renderer is often necessary after import, focusing on key surfaces with descriptive names and correct UV scaling.
- Outsourcing final rendering can save time for projects lacking in-house resources, with studios providing layered passes and organized textures for flexible post-production.
Table of Contents
- Choosing between plugin rendering, live-link, and export/import
- Stage-by-stage workflow: prepare, camera, lighting, materials, render, post
- Interoperability rules that prevent broken transfers
- Which tool categories actually fit your project
- What a production studio expects from a client handoff
- Post-production and render passes: where the image actually gets built
- Managing design changes without breaking your renderer file
- UV mapping and texture preparation before you export
- Reducing polygon count without losing visual quality
- SketchUp plugins that make CGI export smoother
- Making SketchUp materials look right in the renderer
- Fixing the most common import and geometry errors
- What actually separates a smooth pipeline from a painful one
- Getting a finished CGI render without building the pipeline yourself
- Sources
Choosing between plugin rendering, live-link, and export/import
Three integration patterns cover almost every SketchUp to CGI workflow, and picking the wrong one for the project is the single biggest cause of wasted hours.
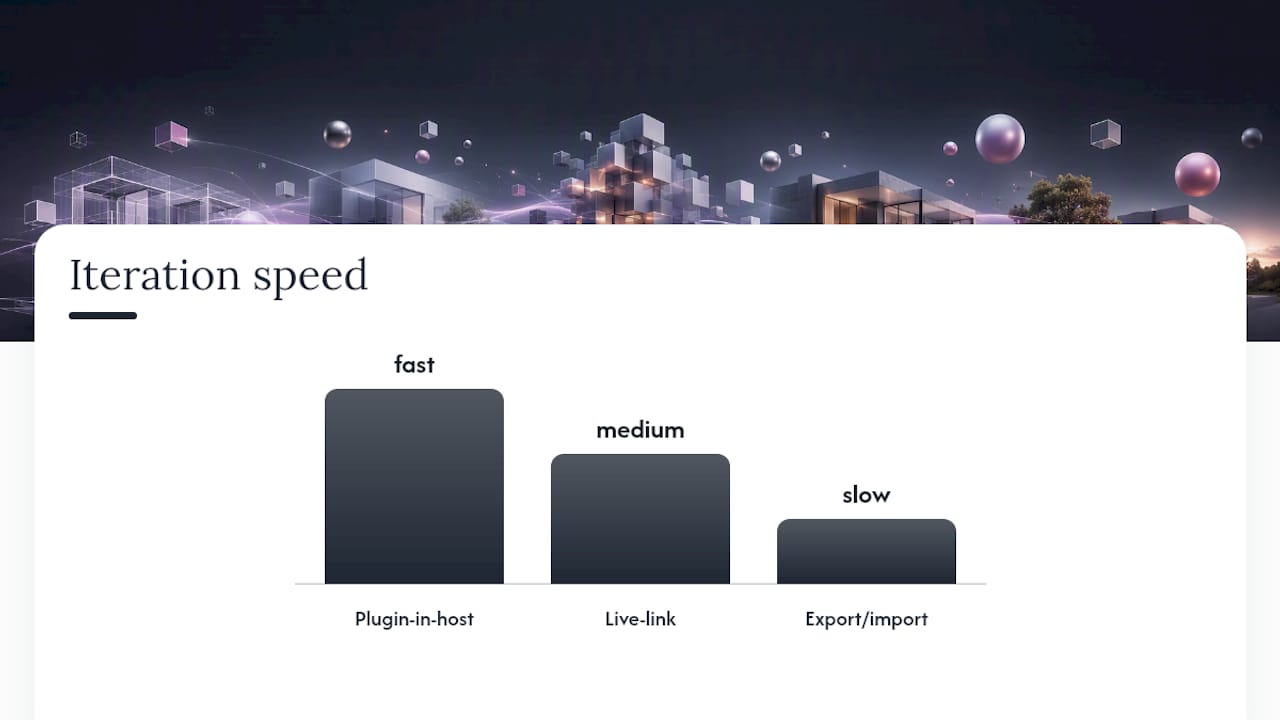
Plugin-in-host rendering (V-Ray for SketchUp, Enscape) renders directly inside SketchUp. There’s no export step, no format conversion, and no risk of geometry drifting between applications. It’s the fastest iteration loop available, but light transport and post-processing control lag behind a standalone engine.
Live-link or linking scripts connect SketchUp to a separate application like 3ds Max, pushing updates through without a full re-export each time. Practitioners commonly route this through an intermediate FBX file and a dedicated linking script, which preserves materials and modifiers as long as both applications run matching plugin versions.
Export/import is the traditional route: export once from SketchUp, import into the target renderer, and work natively from there. It’s the most stable option for a final push but the most painful when the client asks for one more design revision.
Match the pattern to the job:
- Planning application visuals with a fixed design → export/import, since there’s no further iteration to protect.
- Marketing CGI still in design development → live-link, to absorb late changes without rebuilding scenes.
- Quick internal massing studies or client walkthroughs → plugin-in-host rendering, for speed over polish.
Vendor and practitioner guidance consistently frames the choice this way: each pattern trades iteration speed for renderer control, and no single approach wins on both axes at once.
Stage-by-stage workflow: prepare, camera, lighting, materials, render, post
A five-stage structure—geometry, materials, lighting, camera, and post-processing—holds across most CAD rendering pipelines, and SketchUp to CGI work follows it closely. Here’s the sequence that keeps a project reproducible rather than a one-off scramble.
- Model prep. Fix scale first. Purge unused components and materials (Window > Model Info > Statistics > Purge). Check for reversed faces (blue-back instead of white-front) and repair with right-click > Reverse Faces. Hide or delete construction geometry, guide lines, and stray edges that never made it into a group. Group loose geometry and convert repeated elements into components rather than groups, since components update everywhere at once when you edit the source.
- Tags and organisation. Rename SketchUp’s default “Layer0” tags into meaningful categories: structure, furniture, planting, entourage. Consistent naming here is what makes reload and reassignment painless later.
- Camera and composition. Set up scenes for every camera angle you intend to render, and save them before exporting. A quick clay render (flat grey materials, no textures) at this stage catches geometry problems before you’ve wasted time on materials.
- Materials. Apply a physically based (PBR) mindset even inside SketchUp: separate colour, roughness, and reflectivity thinking rather than relying on one flat texture. Name materials descriptively (oak_flooring_light, render_render_white) so they’re identifiable once inside the renderer.
- Export. Strip unused geometry, embed or collect textures, and export only what the target renderer needs. FBX generally carries cameras and hierarchy better than OBJ.
- Renderer import and lighting. Reassign any materials that lost their mapping in transit. Run a fast, low-sample lighting test before committing to a full-quality pass, then move to progressive or bucket rendering once exposure and shadow direction look right.
- Post-production. Export render passes as a multi-channel EXR (diffuse, reflection, shadow, ambient occlusion, Z-depth) rather than a single flattened image, then grade and composite in Photoshop.
A competent stage-by-stage pipeline built this way produces noticeably more consistent, magazine-quality output than jumping straight from a rough SketchUp model to a “render” button.
Pro Tip: Budget your time honestly: a clean model prep session (30 to 60 minutes) saves far more time than it costs, because every geometry error caught before export is one you don’t have to hunt for inside an unfamiliar renderer’s error log.
Interoperability rules that prevent broken transfers
Format choice decides how much of your model survives the trip intact. SKP stays the native format when you’re linking or working plugin-in-host; it preserves everything, including tags and scenes, but only inside SketchUp-aware tools. FBX is the workhorse for moving into 3ds Max or most standalone engines, carrying cameras, hierarchy, and materials reasonably well, though version mismatches between SketchUp and the target renderer cause more broken imports than any other single issue. OBJ is simple and dependable for static geometry but drops cameras, lights, and animation entirely. USD/USDA is gaining ground for complex scenes with layered references, particularly where multiple artists touch the same asset. glTF suits real-time and web-facing deliverables rather than offline final-frame rendering.
Practical rules that save hours:
- Always use relative texture paths, never absolute ones tied to your local drive, or textures vanish the moment the file moves machines.
- Adopt one naming convention across the studio (material_surface_finish) so reassignment inside the renderer is a search-and-replace, not guesswork.
- Keep tags aligned with your component hierarchy so reloading an updated SketchUp file doesn’t scramble organisation on the renderer side.
- Swap high-poly entourage (trees, furniture, crowds) for lightweight proxies during modelling, then substitute full-resolution assets only at final render.
3ds Max’s own import filters can preserve layer structure and camera views when the SketchUp file is well organised beforehand, which is the strongest argument for doing the tagging work early rather than fixing it after import.
Which tool categories actually fit your project
Render engines split into four functional categories, and picking the right one depends on what stage of the project you’re at, not brand preference.
- In-host renderers (V-Ray for SketchUp, Enscape) keep the feedback loop tight, ideal for client walkthroughs and early design sign-off where speed beats final polish.
- Standalone engines (V-Ray for 3ds Max, Corona) handle complex light transport, volumetrics, and denoising far better, and they’re where final marketing or planning frames should land. Rendering directly in SketchUp is fast but standalone engines still lead on light transport and atmosphere for final output.
- Live-link and linking scripts cut re-export overhead on projects still moving through revisions, at the cost of extra setup and strict version matching between SketchUp and the target host.
- Asset and texture managers keep material scale and naming consistent across a studio’s library, which matters more than it sounds once three artists are pulling from the same asset pool on one job.
Match the category to the deliverable: planning application imagery wants final-frame quality from a standalone engine, marketing sequences often justify a live-link setup to absorb late client feedback, and quick concept studies rarely need more than in-host rendering.
What a production studio expects from a client handoff
A studio-tested SketchUp to CGI workflow depends as much on what arrives in the brief as on the render settings. Visual Trick works across property developers, architects, planning consultants, and estate agents, and the file quality supplied at the outset determines how much of the budget goes into fixing geometry versus building the actual image.
A clean handoff typically includes:
- The SketchUp file with saved scenes and named cameras, not just a raw model with no viewpoints defined.
- Textures collected alongside the model, not linked to paths that only exist on the client’s machine.
- A scale reference, since a surprising number of imported models arrive at the wrong real-world dimensions.
- Site photography where the render needs to sit convincingly against an existing context.
In return, deliverables typically include multi-channel EXR passes for flexible grading, layered PSD files for revisions without a full re-render, and organised texture sheets that make future edits faster. Time budgets vary by scene complexity and revision count, so studios scope each brief individually rather than quoting a flat turnaround. Readers curious about the stages behind a finished image can see the fuller breakdown in this guide to architectural CGI rendering.
Post-production and render passes: where the image actually gets built
Post-production is not a cosmetic afterthought bolted onto a finished render. It’s where roughly a third of the final image quality gets decided, because a single flattened output leaves almost no room to correct exposure, colour balance, or reflections without re-rendering.
Export separate passes rather than one composite: diffuse (base colour with no lighting), reflection, shadow, ambient occlusion, and Z-depth for atmospheric effects like fog or depth of field. Save these as a multi-channel EXR file, which keeps every pass in one container at full bit depth rather than scattering compressed JPEGs across a folder.
Inside Photoshop, the grading sequence usually runs: balance exposure using the diffuse and reflection passes together, add ambient occlusion at low opacity to deepen contact shadows, then use the Z-depth pass to drive selective blur or atmospheric fade on distant elements. Colour grading comes last, adjusting warmth and contrast to match the intended mood, whether that’s a bright marketing shot or a neutral, planning-committee-appropriate daylight scene.
Time-box this stage honestly. A straightforward exterior with four or five passes might take under an hour to grade once the render itself is done; a complex interior with multiple light sources and reflective surfaces can take considerably longer. Skipping pass separation to save that time almost always costs more later, when a client asks for one small tonal change and the only option is a full re-render from scratch.
Managing design changes without breaking your renderer file
Design revisions are the norm, not the exception, and how you name and organise a SketchUp model determines whether a change takes five minutes or forces a full rebuild in the renderer.
Naming discipline matters more than any plugin. Give components descriptive, consistent names (window_type_a, facade_panel_north) rather than SketchUp’s default “Component#12”. When a linker or importer reloads the file, it matches objects by name, so a renamed component becomes a duplicate rather than an update.
Tags, not layers, for organisation. SketchUp’s tag system (formerly called layers) should map to logical groups: structure, glazing, landscaping, furniture. Keep geometry that changes together on the same tag, so toggling visibility during troubleshooting isolates problems fast.
Components over groups for anything repeated. A component edited once updates every instance across the model and, if the renderer supports instancing, across the render too. Groups don’t share this behaviour, meaning ten manually placed windows become ten manual fixes when the design changes.
For live-linked projects, this discipline compounds: a linking script re-syncs by matching names and hierarchy, so a model with disciplined naming reloads cleanly, while a messy one forces manual reassignment of every material and light. Studios running frequent revision cycles usually enforce a naming convention document from day one of a project specifically to avoid this. It’s a small piece of process, but the practitioner guidance on SketchUp-to-3ds Max linking is consistent that version and naming mismatches, not creative disagreements, cause most re-export headaches.
UV mapping and texture preparation before you export
Texture problems rarely announce themselves until the model lands inside the renderer, by which point diagnosing them costs far more time than fixing them would have in SketchUp.
Start with UV mapping itself. SketchUp applies UVs automatically to most geometry, but complex or non-planar surfaces (curved facades, organic terrain) often need manual adjustment using the native Texture > Position tool before export, or the texture will stretch and smear once it hits a renderer that respects UV data more strictly than SketchUp’s viewport does.
Texture scale needs checking against real-world dimensions, not eyeballed. A brick texture that looks fine at SketchUp’s default zoom can reveal itself as comically oversized once rendered at full resolution. Set texture scale using SketchUp’s Tape Measure tool against a known reference, such as a door or brick course, before finalising materials.
Resolution planning matters too: match texture resolution to expected camera distance rather than applying 4K textures uniformly across a scene. Background elements rarely need the resolution a hero facade does, and oversized textures across dozens of materials bloat file size without adding visible quality.
Finally, flatten and simplify anything using SketchUp’s native “Photo Match” or projected textures before export, since these mapping types don’t always translate predictably into a renderer’s UV system. A quick test render of just the textured surface, isolated from the rest of the scene, catches stretching or misalignment before it’s buried in a full composition.
Reducing polygon count without losing visual quality
High poly counts slow every stage downstream, from SketchUp’s own viewport responsiveness to render times inside the final engine, and most of that geometry is invisible in the finished image anyway.
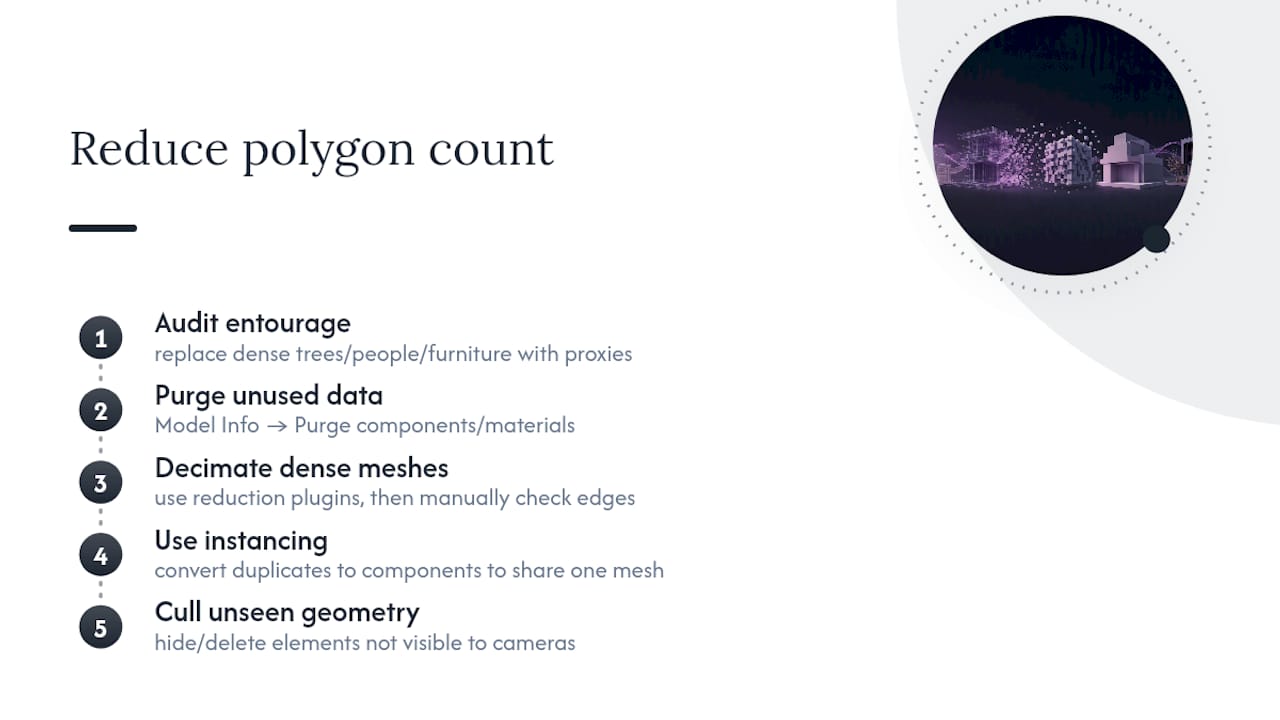
Start by auditing entourage. Trees, people, and furniture models downloaded from SketchUp’s 3D Warehouse are frequently far denser than they need to be for background use. Swap dense entourage for lower-poly proxies during the modelling phase, and only bring in high-resolution versions for hero elements sitting close to camera.
Use SketchUp’s native tools before reaching for a plugin: the Purge command in Model Info strips unused geometry, components, and materials that accumulate during design iterations. Beyond that, extensions built for polygon reduction can decimate dense meshes (typically imported CAD or scanned geometry) while preserving silhouette, though manual review afterward catches spots where automated reduction has damaged a critical edge or curve.
Instancing matters as much as raw mesh density. A hundred identical chairs modelled as a hundred separate groups multiply file size linearly; the same hundred chairs as component instances share one underlying mesh, and most renderers respect that instancing to cut memory load significantly.
Finally, cull what the camera never sees. Interior walls facing away from every saved camera angle, foundation geometry below ground level, and roof structures hidden by parapets add nothing to the render and everything to processing time. A model built with tags for these hidden elements makes deleting or hiding them before export a five-minute job rather than a manual hunt through the outliner.
SketchUp plugins that make CGI export smoother
The right extension at the modelling stage saves far more time than any renderer-side fix later. SketchUp’s extension ecosystem is one of its genuine strengths for CGI workflows, and a handful of categories cover most practical needs.
Cleanup and optimisation extensions handle the purge, geometry repair, and polygon reduction tasks that would otherwise eat hours of manual work, particularly on models imported from CAD software with dense, messy geometry.
Export-format extensions extend SketchUp’s native output beyond its default set, adding or improving FBX, OBJ, and other interchange formats with more granular control over what gets included, embedded, or stripped during export.
Render-in-host plugins, V-Ray for SketchUp being the clearest example, sit inside SketchUp itself and let you preview lighting and materials without ever leaving the modelling environment, which is invaluable during early design review before a project is locked enough to justify a full export.
Linking and live-sync tools bridge SketchUp to standalone applications like 3ds Max, maintaining a connection so model changes propagate without a manual re-export each time, at the cost of stricter version matching between both ends of the link.
Layer these thoughtfully rather than installing everything available. A cluttered extension list slows SketchUp’s own performance and, more importantly, makes it harder to diagnose which plugin caused a given export or import problem when something eventually breaks.
Making SketchUp materials look right in the renderer
Materials that look convincing in SketchUp’s viewport frequently look flat or wrong once imported, because SketchUp’s simplified shading model doesn’t map directly onto a renderer’s physically based system.
The core issue is that SketchUp materials are essentially just a colour and a texture, with no native roughness, reflectivity, or bump data attached. Most renderers expect a fuller PBR (physically based rendering) material with separate channels for base colour, roughness, metalness, and normal or bump detail. When a SketchUp material imports, it usually only fills the base colour or diffuse channel, leaving everything else at a generic default, which is why freshly imported scenes often look uniformly matte and lifeless.
Fix this by rebuilding key materials once inside the renderer rather than trusting the import to carry everything across. Prioritise hero surfaces (facades, flooring, glazing) for manual rebuild, and let secondary or background materials use faster default presets. Match texture scale carefully during rebuild too, since a texture that mapped correctly in SketchUp can appear stretched or tiled incorrectly once the renderer applies its own UV interpretation.
Naming discipline pays off again here. If SketchUp materials are named descriptively before export (oak_flooring_light, glass_clear_low_iron), matching them to renderer-side presets becomes a quick visual scan rather than a guessing game through dozens of generically labelled entries. A consistent naming convention across a studio’s material library turns this rebuild step into minutes rather than a recurring half-day task on every project.
Fixing the most common import and geometry errors
Most import failures trace back to a small, predictable set of causes, and knowing which one you’re looking at saves considerable diagnostic time.
Missing or pink textures almost always mean an absolute file path broke when the model moved computers. The fix is embedding textures where the export format allows, or switching to relative paths and keeping textures in a folder alongside the model file.
Flipped or inside-out faces show up as dark or oddly shaded patches, because reversed normals confuse how the renderer calculates light bounce. Catch these in SketchUp before export using Reverse Faces, since fixing them post-import inside an unfamiliar renderer’s tools is slower and less reliable.
Scale mismatches appear when a model that looked correct in SketchUp renders as absurdly oversized or tiny furniture. This stems from unit mismatches between the export and import settings, so confirm both applications agree on metric or imperial units before exporting, not after.
Missing cameras or scenes happen when an export format that doesn’t support cameras (OBJ, for instance) gets used for a project that needed saved viewpoints. Switch to FBX or a format matching your renderer’s camera support if saved angles matter.
Broken hierarchy or exploded groups occur when an export flattens nested groups and components into a single mesh, losing the editability needed for material reassignment. Check export settings for an option to preserve hierarchy, and test with a small sample geometry before committing a full complex model to an unfamiliar export path.
What actually separates a smooth pipeline from a painful one
Most guidance on SketchUp to CGI workflows treats software choice as the deciding factor. It isn’t. The deciding factor is discipline in the SketchUp file itself, before any export happens, and that’s the part conventional advice consistently underweights.
A studio-tested pipeline succeeds or fails on naming conventions, tag organisation, and component strategy, decided in the first hour of modelling, not the render settings applied three weeks later. The advice to “use FBX” or “try a live-link” is true but incomplete: format choice only pays off on a well-organised model. A messy SketchUp file exported as pristine FBX is still a messy renderer scene.
The overrated fix is chasing a new plugin every time an import breaks. The underrated one is a ten-minute model audit before export, purging, checking faces, confirming scale, that catches ninety percent of the problems a plugin would otherwise be asked to solve downstream.
If there’s one thing to prioritise first, it’s editability. Build the model so that a late design change updates cleanly rather than forcing a rebuild, because on real projects, that change is coming whether the brief says so or not.
— Paride
Getting a finished CGI render without building the pipeline yourself
Running this entire workflow in-house makes sense when you have the renderer licences, the plugin expertise, and, critically, the spare capacity to absorb a tight planning deadline or a marketing brief that lands with two weeks’ notice. When any of those three is missing, outsourcing the final render stage is usually the faster route to a usable image, not a compromise.
An experienced studio takes a prepared SketchUp file, whatever stage it’s at, live-linked, exported, or somewhere in between, and handles the camera, lighting, materials, and post-production passes described above, returning layered PSDs and organised texture sheets rather than a single flattened image with no room to adjust.

This approach fits particularly well for planning submissions, where the visual needs to withstand scrutiny from a planning officer, and for marketing campaigns where a property developer or estate agent needs a polished exterior or interior scene without hiring a dedicated visualisation specialist in-house. If your brief involves a planning application specifically, the planning-grade visuals service covers the accuracy and presentation standard that submission requires. For architects and developers weighing up full production support more broadly, the architectural visualisation services page sets out how a brief moves from SketchUp file to finished deliverable, and the next step is simply sending over your model and camera angles for a scoped quote.
Sources
- Import and export filters — 3ds Max
- From SketchUp model to magazine-quality render: a step-by-step walkthrough
- From CAD model to finished render: how architectural rendering actually works
