
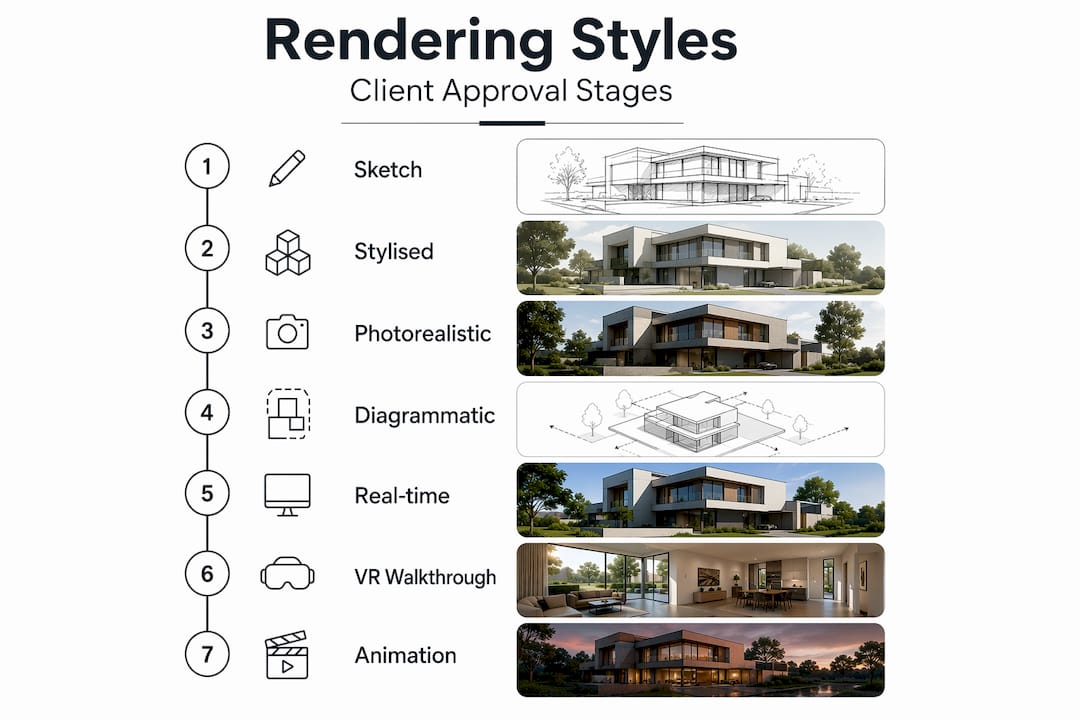
Photorealistic stills are the single most reliable style for securing final client sign-off. Pair them with stylised or sketch renders at concept stage and interactive or real-time views for stakeholder alignment, and you cover the full approval journey without confusion at any gate.
The three combinations that work consistently across UK practice:
- Concept gate: Stylised or watercolour sketch + diagrammatic massing render. Keeps feedback on form and mood, not finishes.
- Design development gate: Photorealistic detail stills + material swatch renders. Grounds decisions in actual specification.
- Final approval and marketing: Photorealistic stills (exterior and interior) + animation or interactive viewer where budget allows. Builds the trust and clarity that converts hesitation into sign-off.
These styles work because they match the client’s cognitive state at each stage. Early on, clients need to feel the direction. Later, they need to see the thing. Showing a photorealistic render too early can slow decisions by inviting premature comments on finishes before the layout is settled. The styles list below covers every major technique in detail, the how-to-choose section maps them to project stages and client types, and the presentation workflow section explains how to structure the review itself.
Table of Contents
- Top rendering styles for client design approval: the full breakdown
- How to choose the right style by stage, client, and risk
- Composition, lighting, and camera craft that lift approval rates
- Deliverables, formats, turnaround, and UK cost expectations
- A practical review workflow to win sign-off
- How Visualtrick approaches renders that secure approvals
- Legal and copyright considerations for rendering assets
- Key takeaways
- The render styles shaping UK client approvals
- Visualtrick: approval-grade CGI for architects and designers
- Useful sources and further reading
Top rendering styles for client design approval: the full breakdown
Each style below has a distinct role in the approval process. The question is never which style looks best in isolation; it is which style answers the client’s current question most clearly.
1. Photorealistic stills

The gold standard for final approval and marketing. Photorealistic CGI uses physically based rendering to simulate real-world light, materials, and shadow with near-photographic accuracy. Fidelity is high; the client sees exactly what the finished space or building will look like. For interior designers, a photorealistic kitchen render at 08:00 light answers “Will this feel bright in the morning?” with no ambiguity.

Pros: Builds maximum trust at final stages; directly usable in marketing, brochures, and planning submissions. Cons: Expensive and time-consuming to produce; shown too early, it invites premature specification debates.
Ideal stage: Design development through to final approval and marketing. Deliverables: High-resolution TIFF or JPEG stills, typically 4K or above.
2. Stylised and conceptual renders
Stylised renders deliberately soften detail. Think bold colour washes, simplified geometry, or graphic line work. The point is to direct feedback to massing, proportion, and spatial relationships rather than material choices. A client who sees a stylised elevation cannot fixate on brick colour because the brick colour is not there yet.
Pros: Fast to produce; steers early feedback productively. Cons: Some clients misread them as unfinished work, so a brief explanation at presentation helps.
Ideal stage: Concept and early design development. Deliverables: PNG or PDF stills, often presented in a slide deck.
3. Sketch and watercolour renders
Hand-drawn or digitally rendered sketches carry an intentional looseness that signals “this is a direction, not a decision.” Watercolour washes over line work are particularly effective for residential and heritage projects, where a softer aesthetic matches the client’s expectations. Conceptual styles like these help direct early feedback to form and mood rather than finishes.
Pros: Communicates intent without over-committing; builds creative confidence with clients who find technical drawings intimidating. Cons: Not suitable for planning submissions or contractor sign-off.
Ideal stage: Concept gate only. Deliverables: JPEG or PDF; often A3 printed for face-to-face presentations.
4. Diagrammatic and sectional renders
Cut-through sections, exploded axonometric views, and annotated diagrams answer the question “How does this actually work?” They are the right tool for planning consultants, contractors, and technical sign-off meetings where spatial logic matters more than visual appeal. A sectional render showing floor-to-ceiling heights and structural zones communicates what no photorealistic view can.
Pros: Precise; supports planning applications and contractor briefings. Cons: Non-technical clients often find them hard to read without guidance.
Ideal stage: Planning submission and technical sign-off. Deliverables: Vector PDF or high-resolution PNG with annotation layers.
5. Real-time and interactive renders
Real-time viewers let clients navigate a space themselves, toggle material options, and explore viewpoints you did not pre-select. For large residential schemes, mixed-use developments, or any project with multiple non-technical stakeholders, the ability to “walk through” a space in a browser or on a tablet reduces rounds of static feedback. Real-time visualisation helps stakeholders make immediate choices and cuts the back-and-forth that static images generate.
Pros: High stakeholder engagement; surfaces objections early. Cons: Higher production cost; requires a capable device to run smoothly.
Ideal stage: Design development and stakeholder workshops. Deliverables: Web-based viewer link or standalone executable.
6. VR walkthroughs
A step beyond real-time viewers, VR places the client inside the space at 1:1 scale. The spatial sense is unmatched for large or complex projects. Particularly effective for care home developers, hospitality clients, and large residential schemes where the feel of a corridor or a communal space is a key approval criterion.
Pros: Eliminates scale misreading; emotionally persuasive for stakeholder buy-in. Cons: Requires headset hardware; not all clients are comfortable with VR.
Ideal stage: Design development and investor or planning presentations. Deliverables: VR package (Oculus/Meta Quest compatible) or 360° panorama for web.
7. Animation and walkthrough films
A rendered animation moves the client through the project on a pre-set path. It is the most persuasive format for off-plan sales, investor pitches, and public consultation. The narrative arc of a walkthrough film answers “What is the experience of arriving and moving through this building?” in a way no still image can. See Visualtrick’s pre-construction marketing visuals for examples of how animation supports sales-stage approvals.
Pros: Highly persuasive for non-technical audiences; reusable across marketing channels. Cons: Longest production time and highest cost; changes after render are expensive.
Ideal stage: Marketing, sales, and investor approval. Deliverables: MP4 at 1080p or 4K; sometimes 360° video.
8. Photomontage and verified views
A photomontage composites a CGI building into a real photograph of the site. Verified photomontages follow strict protocols (camera position, lens data, survey control points) and are accepted by UK planning authorities as evidence of visual impact. For planning applications, this is often the required format. Visualtrick’s aerial CGI photomontage service covers both standard and verified view production.
Pros: Directly accepted by planning authorities; shows the building in real context. Cons: Requires accurate survey data and photography; strict production protocols add time.
Ideal stage: Planning submission. Deliverables: High-resolution TIFF with methodology report.
9. Clay and white model renders
A clay or white model render strips all material and colour information, leaving only form and light. It is the fastest way to evaluate massing, proportion, and shadow without any material bias. Architects use them internally before committing to a photorealistic pass, but they are also effective in client presentations when the conversation needs to stay on form.
Pros: Fast to produce; neutral and unambiguous. Cons: Clients sometimes find them abstract; best paired with a brief verbal explanation.
Ideal stage: Concept and early design development. Deliverables: JPEG or PNG stills.
10. Material swatch and exploded view renders
Material swatch renders isolate a surface or component and show it at close range with accurate texture, reflectance, and colour. Exploded views separate components spatially to show how they assemble. Both are approval tools for specification sign-off: the client approves the stone finish, the joinery detail, or the façade panel system before it goes to procurement.
Pros: Precise specification tool; reduces costly late-stage material changes. Cons: Narrow in scope; not a substitute for a full scene render.
Ideal stage: Design development and specification sign-off. Deliverables: High-resolution JPEG or PDF with material references.
Rendering styles at a glance
| Style | Best for | Fidelity | Speed | Typical cost band | Deliverable format | Project stage |
|---|---|---|---|---|---|---|
| Photorealistic stills | Final approval, marketing | Very high | Slow | High | TIFF/JPEG | Development → Final |
| Stylised/conceptual | Direction setting | Low–medium | Fast | Low | PNG/PDF | Concept |
| Sketch/watercolour | Mood, residential | Low | Fast | Low | JPEG/PDF | Concept |
| Diagrammatic/sectional | Technical sign-off, planning | Medium | Medium | Low–medium | Vector PDF | Planning |
| Real-time/interactive | Stakeholder workshops | Medium–high | Medium | Medium–high | Web viewer | Development |
| VR walkthrough | Investor, large schemes | High | Slow | High | VR package/360° | Development, marketing |
| Animation/walkthrough | Sales, investor pitches | High | Slowest | Highest | MP4 | Marketing |
| Photomontage | Planning submission | Very high | Medium–slow | Medium–high | TIFF + report | Planning |
| Clay/white model | Massing review | Low | Fast | Low | JPEG/PNG | Concept |
| Material swatch/exploded | Specification sign-off | Very high | Fast | Low–medium | JPEG/PDF | Development |
Pro Tip: Caption every render in your presentation with the specific question it answers: “This view shows the kitchen at 08:00 in December — does the natural light feel sufficient?” Framed questions produce focused feedback and prevent clients from commenting on things outside the current approval scope.
How to choose the right style by stage, client, and risk
The right rendering technique for clients depends on three variables: where you are in the project, who is in the room, and how much a wrong decision costs at that gate.
Decision framework by project stage
| Stage | Recommended style(s) | Expected fidelity | Delivery format | Primary approver |
|---|---|---|---|---|
| Concept | Stylised stills, sketch/watercolour, clay model | Low–medium | PDF/PNG in deck | Design lead, client principal |
| Design development | Photorealistic detail stills, material swatches, real-time viewer | Medium–high | JPEG set + web link | Client principal, planning consultant |
| Planning submission | Photomontage (verified), diagrammatic sections | Very high | TIFF + PDF report | Planning authority, LPA officer |
| Marketing/sales | Photorealistic stills, animation, VR | Very high | MP4, TIFF, web viewer | Developer, sales team, estate agent |
Naming a final approver at project kickoff is one of the most effective ways to prevent late-stage disputes. If the answer to “who signs off?” is “the team,” challenge it immediately and secure one named decision-maker.
Kickoff questions to set with the client
- Who has final sign-off authority at each gate? (Name one person per gate.)
- What is the hard deadline for each approval?
- Are there visual references or precedents the client wants to match or avoid?
- What level of approximation is acceptable at concept stage?
- Will the renders be used for planning, marketing, or both? (This determines format and protocol requirements.)
- How many stakeholders will review each image, and do they all have equal authority?
Red flags that delay approval
- Showing photorealistic renders at concept stage before layout is agreed. Clients will comment on the worktop colour when you need feedback on the room proportions.
- Too many approvers with no named decision-maker. Assigning a single final approver at kickoff removes this risk.
- Missing approver authority: a reviewer who cannot actually approve the work will escalate to someone who can, adding a round of delay.
- Open-ended review windows. Time-boxed review periods of 48–72 hours with stated consequences keep projects moving.
Combining styles across gates
Present a stylised concept alongside a photorealistic detail of a key element (a staircase, a façade panel) when you need to show direction without over-committing. The stylised image holds the conversation at the right level; the detail render proves you can deliver the quality. This pairing prevents scope creep because the client approves the direction in one image and the quality benchmark in the other, not the full specification.
For interior designers, the role of visualisation in proposals follows the same logic: concept mood boards first, photorealistic material close-ups once the scheme direction is locked.
Composition, lighting, and camera craft that lift approval rates
Composition and visual hierarchy guide client attention more reliably than render engine settings. A technically perfect render with a poor camera position will lose a client’s focus; a well-composed image at medium fidelity will hold it.
Camera and lens checklist
- Use a 35–50mm equivalent focal length for interiors to avoid wide-angle distortion that makes rooms look larger than they are.
- Set camera height at 1,500–1,600mm for interior views (standing eye height) unless a lower angle is needed to show a ceiling feature.
- For exteriors, use a 28–35mm equivalent and place the horizon line at one-third height to give the building visual weight.
- Avoid symmetrical compositions for residential projects; a slight offset creates a more natural, inviting feel.
- Use the rule of thirds to place the primary design feature (a feature wall, a staircase, a façade detail) at an intersection point.
Lighting checklist
- Establish a dominant light source first (sun direction, key artificial light) before adding fill or accent lights.
- Use a three-light hierarchy: dominant, fill, accent. Flat, even lighting removes depth and makes spaces look unconvincing.
- Match the time of day to the approval question. A client asking about evening ambience needs a dusk or artificial-light render, not a midday shot.
- Keep exposure consistent across an image set. Wildly different exposures between views make the project feel incoherent.
- Compositing passes (AOVs) let you adjust exposure, colour temperature, and shadow depth after the render without re-running the full calculation. Use them on every job.
Material and detail guidance
Show the finishes that carry the most approval risk: the primary floor material, the dominant wall finish, and any bespoke joinery or façade element. Add callout annotations directly on the image with material references (e.g. “Porcelain tile: Minoli Atlas Plan Grigio 120×60”) so the client approves the specification, not just the look.
Pro Tip: Build a compositing pass library for your most common scene types (living room, exterior elevation, kitchen). When a client requests a lighting change, you can deliver a revised image in hours rather than days by adjusting the pass rather than re-rendering from scratch.
Deliverables, formats, turnaround, and UK cost expectations
Knowing what to deliver, in what format, and roughly when is as important as choosing the right style. The figures below reflect typical UK studio practice; actual costs and timelines vary with project complexity, revision rounds, and licensing requirements.
Common deliverables and file formats
- Single photorealistic still: TIFF or JPEG, minimum 4K (3840×2160px). Standard deliverable for approvals and marketing.
- Image set (4–8 views): Same format; often delivered as a shared folder with a naming convention tied to the drawing register.
- Animation/walkthrough film: MP4 at 1080p or 4K, H.264 or H.265 codec. Delivered with a master file and a compressed web version.
- Interactive viewer: Web link (HTML5/WebGL) or standalone executable. Requires browser compatibility check before client handover.
- VR package: Oculus/Meta Quest compatible build or 360° JPEG panorama set for web embedding.
- Photomontage (verified): High-resolution TIFF with a methodology report documenting camera position, lens data, and survey control points.
- Material swatches/exploded views: High-resolution JPEG or PDF with material references and finish codes.
Indicative timelines (UK studio practice)
| Deliverable | Typical turnaround | Key variables |
|---|---|---|
| Concept/stylised stills | 2–5 working days | Model complexity, number of views |
| Photorealistic stills (single) | 5–10 working days | Scene complexity, revision rounds |
| Photorealistic image set (4–8 views) | 10 working days | Complexity, material library availability |
| Animation (60 seconds) | 4–8 weeks | Scene complexity, post-production |
| Interactive viewer | 3–6 weeks | Model optimisation, feature set |
| Verified photomontage | 2–4 weeks | Survey data availability, site photography |
Indicative cost bands
Costs in UK studios fall into three broad bands. Low band covers concept stills, clay renders, and simple diagrammatic work. Mid band covers photorealistic image sets, material swatches, and standard photomontages. High band covers animations, interactive viewers, VR packages, and verified photomontages with full methodology reports. The factors that move a job up the cost scale are scene complexity, number of revision rounds, licensing of third-party assets (furniture libraries, plant models), and whether the output needs to meet planning authority standards.
Never treat a quoted cost as fixed until the brief is fully defined. Scope changes after render commencement are the single biggest driver of cost overruns.
Versioning and handover checklist
- File naming convention tied to drawing revision (e.g. ProjectName_ViewID_Rev03.tif).
- Resolution confirmed against end use (print minimum 300 DPI at final size; screen minimum 72 DPI at 4K).
- CAD or BIM data version recorded alongside each render set.
- Licence notes for any third-party assets included in the deliverable.
- Metadata embedded (project name, date, revision, studio contact).
- Planning-ready outputs: methodology report, camera survey data, and sign-off from the planning consultant before submission.
For a full briefing checklist, Visualtrick’s property architect visualisation checklist covers the key questions to resolve before commissioning any render set.
A practical review workflow to win sign-off
The best renders in the world will not secure approval if the review process is vague. Structure the process and the sign-off follows.
The five-step review workflow
- Prepare the package. Assemble the render set with explicit scope notes: what is shown, what is not yet resolved, and what the client is being asked to approve at this gate. Include comparison images where a change has been made since the last version.
- Share a single canonical link. One shareable link with version control prevents reviewers from referencing outdated images. Never send floating copies by email.
- Ask for “approve or request changes” by a specific deadline. State the deadline in the covering message and what happens if it passes without a response (proceed, escalate, or default to the named approver). Time-boxed review periods of 48–72 hours are standard in well-run studios.
- Record the decision and resolve comments. Log all feedback against the version it refers to. Resolve comments in the next revision and mark each one as addressed before re-sharing.
- Request explicit sign-off on the exact version. Do not proceed to the next gate on the assumption of approval. Get a written confirmation tied to the version reference.
For a deeper look at structuring the full workflow, the 3D visualisation presentation workflow guide covers the process from brief to final handover.
Review package checklist
- Explicit scope statement: what this render set covers and what it does not.
- Version reference on every image (file name and revision number visible).
- Outstanding items list: decisions not yet made that will affect later renders.
- Visual callouts on images highlighting the elements requiring approval.
- Comparison images where applicable (previous version alongside current).
- Named approver and deadline stated in the covering message.
Template sign-off wording
Version control and audit trail
- Use a centralised feedback tool with pinned comments and version-specific approvals rather than email threads. This creates a clear record of who approved what and when.
- Store all approved versions in a project folder with the approval confirmation (email or platform record) alongside the file.
- Never overwrite an approved file. Save new revisions as new version numbers.
- At project close, compile an approval log: version, approver name, date, and method of confirmation.
For guidance on faster approval decisions, structured workflows with clear escalation paths consistently outperform ad-hoc email chains.
How Visualtrick approaches renders that secure approvals
Visualtrick’s approach to client approval work is built around one principle: the render must answer the client’s current question, not showcase the studio’s technical range.
On a recent mixed-use residential scheme in the South East, the brief called for planning approval followed by off-plan sales launch. The studio produced a staged render programme: clay model stills at concept stage to lock massing with the planning consultant; photorealistic exterior stills and a verified photomontage for the planning submission; and a photorealistic interior set plus a 60-second animation for the sales launch. Each gate had a named approver, a defined deliverable, and a 48-hour review window.
The outcome:
- Planning submission visuals accepted by the LPA without a request for additional information on visual impact.
- Interior render set approved in a single round of revisions, with the client citing the material callout annotations as the reason feedback was so specific.
- Animation delivered to the sales team two weeks before the launch event, allowing the developer to use it in investor presentations.
Visualtrick works with architects, interior designers, property developers, and planning consultants across the UK. The studio’s architectural visualisation services cover the full range from concept stills to verified photomontages and VR packages. For architects specifically, the CGI for architects service page outlines the studio’s approach to planning-ready and approval-grade imagery.
Legal and copyright considerations for rendering assets
Rendering assets are intellectual property, and the terms of their use matter as much as their visual quality.
Copyright ownership. In the UK, copyright in a CGI image created by a studio belongs to the studio as the author, unless the contract explicitly assigns it to the client. Most professional studios retain copyright and grant the client a licence to use the images for specified purposes (planning, marketing, internal presentations). Check the contract before assuming you own the files outright.
Licence scope. A licence granted for “planning use” does not automatically extend to marketing or social media. If the client intends to use renders across multiple channels, the licence must cover each use explicitly. Misuse of a render outside its licensed scope is a breach of contract.
Third-party assets. Renders frequently incorporate licensed furniture models, plant libraries, and texture packs. The studio’s licence to use these assets may not extend to the client. Before delivering files for use in planning submissions or marketing materials, confirm that all embedded third-party assets are cleared for the intended use.
Planning submissions. Verified photomontages submitted to a Local Planning Authority (LPA) must follow the methodology set out in the relevant guidance (typically the Landscape Institute’s Visual Impact Assessment guidance). Submitting a photomontage that does not meet the required protocol can result in the LPA requesting additional information, delaying the application.
Moral rights. Under the Copyright, Designs and Patents Act 1988, the creator of a work has the right to be identified as the author (the “paternity right”) and the right to object to derogatory treatment of the work. Studios should include a credit line requirement in their contracts; clients should be aware that cropping, colour-grading, or overlaying text on a render without permission may infringe these rights.
File retention. Agree at the outset how long the studio will retain source files (scene files, textures, passes). For planning purposes, source files may need to be available for appeal or review processes. A retention period of five years is common in UK practice, but this should be stated in the contract.
Key takeaways
Photorealistic stills remain the most reliable format for final client sign-off, but the style you choose at each gate determines whether feedback is productive or circular.
| Point | Details |
|---|---|
| Match style to stage | Use sketch or stylised renders at concept, photorealistic stills at development and final approval. |
| Name one approver per gate | Assigning a single named decision-maker at kickoff removes the most common cause of delayed sign-off. |
| Time-box every review | 48–72 hour review windows with stated consequences keep projects on schedule and prevent open-ended feedback loops. |
| Use compositing passes | AOV passes let you respond to lighting and material feedback in hours, not days, without full re-renders. |
| Visualtrick for UK projects | Visualtrick delivers staged render programmes, from concept stills to verified photomontages, matched to each approval gate. |
The render styles shaping UK client approvals
The conversation in UK practice has shifted noticeably over the past few years. Clients who once accepted a set of photorealistic stills as the full deliverable now expect at least the option of an interactive viewer or a 360° panorama. That shift is not driven by technology for its own sake; it is driven by the fact that non-technical stakeholders, particularly in residential and care sector development, genuinely struggle to read a static image as a spatial experience. An interactive view closes that gap.
What I find underestimated in most discussions of rendering technique is the cultural dimension specific to UK clients. British clients, particularly in the residential and heritage sectors, tend to respond poorly to renders that look too “perfect.” Hyper-saturated skies, impossibly crisp shadows, and showroom-clean interiors trigger a scepticism that softer, more naturalistic renders avoid. The most effective approval renders for UK residential work tend to sit just below the threshold of obvious CGI: real-feeling light, a slight atmospheric haze on exteriors, and interiors that look lived-in rather than staged.
The implication for practice is that the render engine is the last thing to optimise. Get the camera position, the lighting hierarchy, and the material accuracy right first. The software will follow.
Visualtrick: approval-grade CGI for architects and designers
Architects and interior designers working to tight approval deadlines need renders that answer the right question at the right stage, not a generic image set that looks impressive but generates circular feedback.

Visualtrick produces staged CGI programmes matched to your approval gates: concept stills to lock direction, photorealistic image sets for design development and final sign-off, verified photomontages for planning, and animations or interactive viewers for marketing and investor presentations. The studio works with architects, interior designers, property developers, and planning consultants across the UK and internationally.
To get a quote, send your brief, plans or model files, target deliverables, and deadline to the studio. For interior designers, the CGI for interior designers page outlines the service in detail. For architects seeking planning-ready and approval-grade imagery, 3D rendering services covers the full scope of what the studio delivers.
Useful sources and further reading
- RIBA Plan of Work (UK-specific): The standard framework for project stages in UK architectural practice. Use it to map rendering deliverables to RIBA stages 1–6.
- Planning Portal (UK-specific): The primary reference for planning application requirements in England and Wales, including guidance on supporting visual documents.
- Landscape Institute Visual Impact Assessment guidance (UK-specific): The authoritative protocol for verified photomontages submitted to UK planning authorities.
- Aligno: The client design approval process: Practical guide to structuring approval workflows, naming approvers, and using centralised feedback tools.
- Claritee: Why design approvals fall apart: Covers staged gate approvals, time-boxed reviews, and how to define “done” at each stage.
- Maxon: Architectural rendering techniques: General practice reference covering composition, lighting hierarchy, and compositing passes.
- Visualtrick: Why architects use 3D visualisation: Studio guide to the practical reasons architects commission CGI and how it supports planning and approval outcomes.
- Visualtrick: Types of visualisation for property marketing: Overview of visualisation formats for UK property marketing, with guidance on choosing between styles.
- Singleclic: How to streamline approvals for faster decisions: Workflow guidance on structured approval processes and escalation paths applicable to studio-client collaborations.
